Archiving Digital Content
History is written from the perspective of those who preserve their records.
LGBTQ religious organizations and congregations make history every day. Increasingly they rely on websites, social media, photos and videos. The historical importance of their endeavors can be lost in the intensity of daily work. This document presents a set of guidelines that shows how to preserve the historical records and online assets as quickly and easily as possible with the current tools.
Archivist Kristen Whitson talks about preserving your online history.Why We Preserve
History is written from the perspective of those who preserve their records.
LGBTQ religious organizations are activists, working for change every day. How change happens is of great interest to historians and future generations. Preserving your organization’s online content takes awareness of its importance and action on a regular basis before it is lost to computer crashing, lost passwords, or new platform policies. Preserving your online content can be done with a few fairly simple routines, the instructions for which are listed below.
What should be preserved?
Whatever digital files are records of your organization’s efforts to fulfill its mission are of historical interest. These might include social media posts, photos, videos, Word documents, Excel spreadsheets, or email for yourself or your organization. See also the LGBTQ RAN Guide to Preserving Historical Records.
Who does the work of preserving?
After creating a digital storage site, anyone who creates digital files, like Word documents or social media posts can preserve them. The instructions below are written to be easily followed. Tech-savvy volunteers or congregation members can boost confidence, but with these instructions, content creators can download digital files on a regular basis.
We are NOT asking you to become archivists or do the advanced organizing work of archivists, though we are glad to help advise you on file organization and naming if you are interested. Our goal is to help preserve this vital information in any and all possible ways.
Your judgement of what is important is crucial to this process! You will know, more than any archivist, what digital files or content accurately describe your work. Any steps you take to preserve your records will indicate to future historians what you deemed worth preserving.
How do we preserve digital files?
This document is meant to help you take a few quick actions on a regular basis to download a copy of your own digital presence, with the eventual goal of donating these files alongside any physical files you may have to an archives or repository at some point in the future. In the same way that the LGBTQ RAN Guide to Preserving Historical Records suggests you “put everything in a box” so that you can donate that box to an archives, this document will show you how to put all of your digital files in one digital “box” so that they are safe and stable whenever you are ready to donate all your historical files--paper and digital.
The first steps in this digital preservation effort will be to consider where you have digital content, which you consider historically rich, and how you can gather those files, safely store them, and back them up for long term preservation.
When should backups happen?
On a regular basis. LGBTQ RAN recommends that every person or organization download, save, and/or back up its digital files on a schedule that suits how often its online presence is updated, from once a month to several times a year. Whatever time-frame you choose, these backups are a necessary step towards preserving these records for history.
Where should we store the digital files?
Best practice is to move copies of digital files onto an external hard drive. This is the most stable hardware available and plugs into computers with a simple USB connection. External hard drives are relatively inexpensive, hold a lot of information, and can be donated to an archive in the future along with any physical records and artifacts you donate. The instructions in this guide assume you will be saving copies and downloads to this external hard drive.
Additionally, you can set up a cloud-based, regular backup service to automatically save another copy of all content on your external hard drive (and any other computer drives you have). The combination of an external hard drive and cloud-based backup service virtually guarantee your files will be saved as permanently as possible.
Considerations
Digital assets can be lost; proactive planning is needed
Digital archivists are concerned with digital preservation, a set of practices that puts digital content into formats that will be most likely to be usable in the future. For instance, we already know of software from the 1990s that is no longer available or supported, like Lotus123 or Word Perfect. The instructions below were written with these principles in mind. It’s reasonable to assume that the formats in which your records are stored, using the instructions below, will be viable formats for the foreseeable future. In general, you do not need to be concerned with how you save your files as you’re saving them; simply saving the files will be a step in the right direction.&
For more information, see the Library of Congress’ guide to recommended formats, or contact LGBTQ RAN for assistance.
Addressing Privacy Concerns
Privacy laws and regulations mean that you are able to preserve information about yourself or your organization, but not really content generated by others. This is to protect the privacy of others.
- In cases where you are able to download information about others, such as photos you have posted on social media, it is worth considering if you or your organization have those individuals’ permission to retain those materials. It is reasonable to assume that if people have given you permission to post their images in photo or video format, you can retain those materials in archival format — but take this determination on a case-by-case basis.
- You could consider posting or enacting some type of Terms of Use statement for your own social media and website. Facebook, Twitter, Instagram and other sites have their own Terms of Use that dictate how those organizations use your data; similarly, you could share with your own online community what it means when they post or contribute to your social media. LGBTQ-RAN’s Terms of Use statement can be found here: https://lgbtqreligiousarchives.org/terms-of-use The section under User Generated Content may be particularly useful. Your terms of use can be posted on your website and as part of your social media profiles.
- Privacy restrictions also mean that it will be much easier for you or your organization to download these online materials prior to donating your organization’s information to an archival repository. It is much more difficult for an archive to find out and archive information about your organization from outside.
Digital preservation and archiving services are available, but not free
The instructions below lay out simple steps for your organization to download your own information in a “do it yourself” method that should take about 30 minutes of your time.
There is also a service called Archive-It that would do all of this for you, and would capture more information than is available through the DIY methods. This may also be an option to capture a large amount of online information on a one-time basis.
An organization called Documenting the Now specializes in capturing social media — particularly Twitter — coverage of social moments and movements. Their work, which focuses on the ethical preservation of content with respect to the content creators, can be helpful in providing context to archiving your own online content. They also maintain a list of archivists who have volunteered to advise activist organizations in ethical social media archiving.
DocNow, as they are colloquially known, has also created instructions for some social media archiving in zine form: https://www.docnow.io/workshops/social-control-2019
Make duplicates of essential digital assets
The 3-2-1 rule of digital storage suggests that you should keep THREE copies of digital files, on at least TWO different media, with at least ONE version in a different disaster risk zone. For instance, this could be easily accomplished by having your files stored on your computer hard drive, with a backup to an external hard drive, and a cloud-based backup service automatically backing up both your computer and external hard drive regularly.
Printing out online content is not a solution
In years past, before there were reliable and easily-accessible methods of preserving digital files, it was commonly advised that organizations should print out copies of all digital files for permanent record-keeping. That is no longer necessary, and following the procedures listed below should ensure that your digital files are preserved without printing.
Digital files, online platforms, and instructions change quickly
We have written these instructions in mid-2020 based on best practices and available information at this time, but we anticipate that the rapidly-changing nature of computing and the Internet will make these instructions outdated or obsolete within a few years or months. The instructions give you a good general idea of how to get started, but please adjust them to work for your organization at the time you’re undertaking these steps.
Time Commitment
Depending on the size of your files, we anticipate that the procedures listed in the following pages will take around 30 minutes once the process is familiar. Downloading digital and social media platform data each month and storing it on an external hard drive will make huge strides in preserving your organization’s work for the historical record.
Maintaining your digital files
Computer files
Computer created files, like email, Word documents, Excel spreadsheets, PowerPoint presentations and other files created in the course of your work are called born-digital files. Because so much work is done with these digital files, preserving them for the historical record can be quite important. Saving them in the folder in which you used them can help future users understand the context; there is no need to re-organize digital files before saving them, but deleting duplicates may be helpful.
We recommend that, first, you understand where all of your computer files are saved. They may be in multiple locations on multiple computers: a church office computer, laptop computers, external hard drives, etc. Next, consider how you might be able to consolidate these files in one place on a regular basis. For instance, once a month, you might upload all files to a cloud-based location (Google Docs or iCloud, for instance) from all computers. Think of this as a digital version of filing paper documents into the office filing cabinet at regular intervals. The specifics of how your files are organized in that “filing cabinet” are less important than getting all of the digital files in one place.
Some suggestions for file organization can be found here.
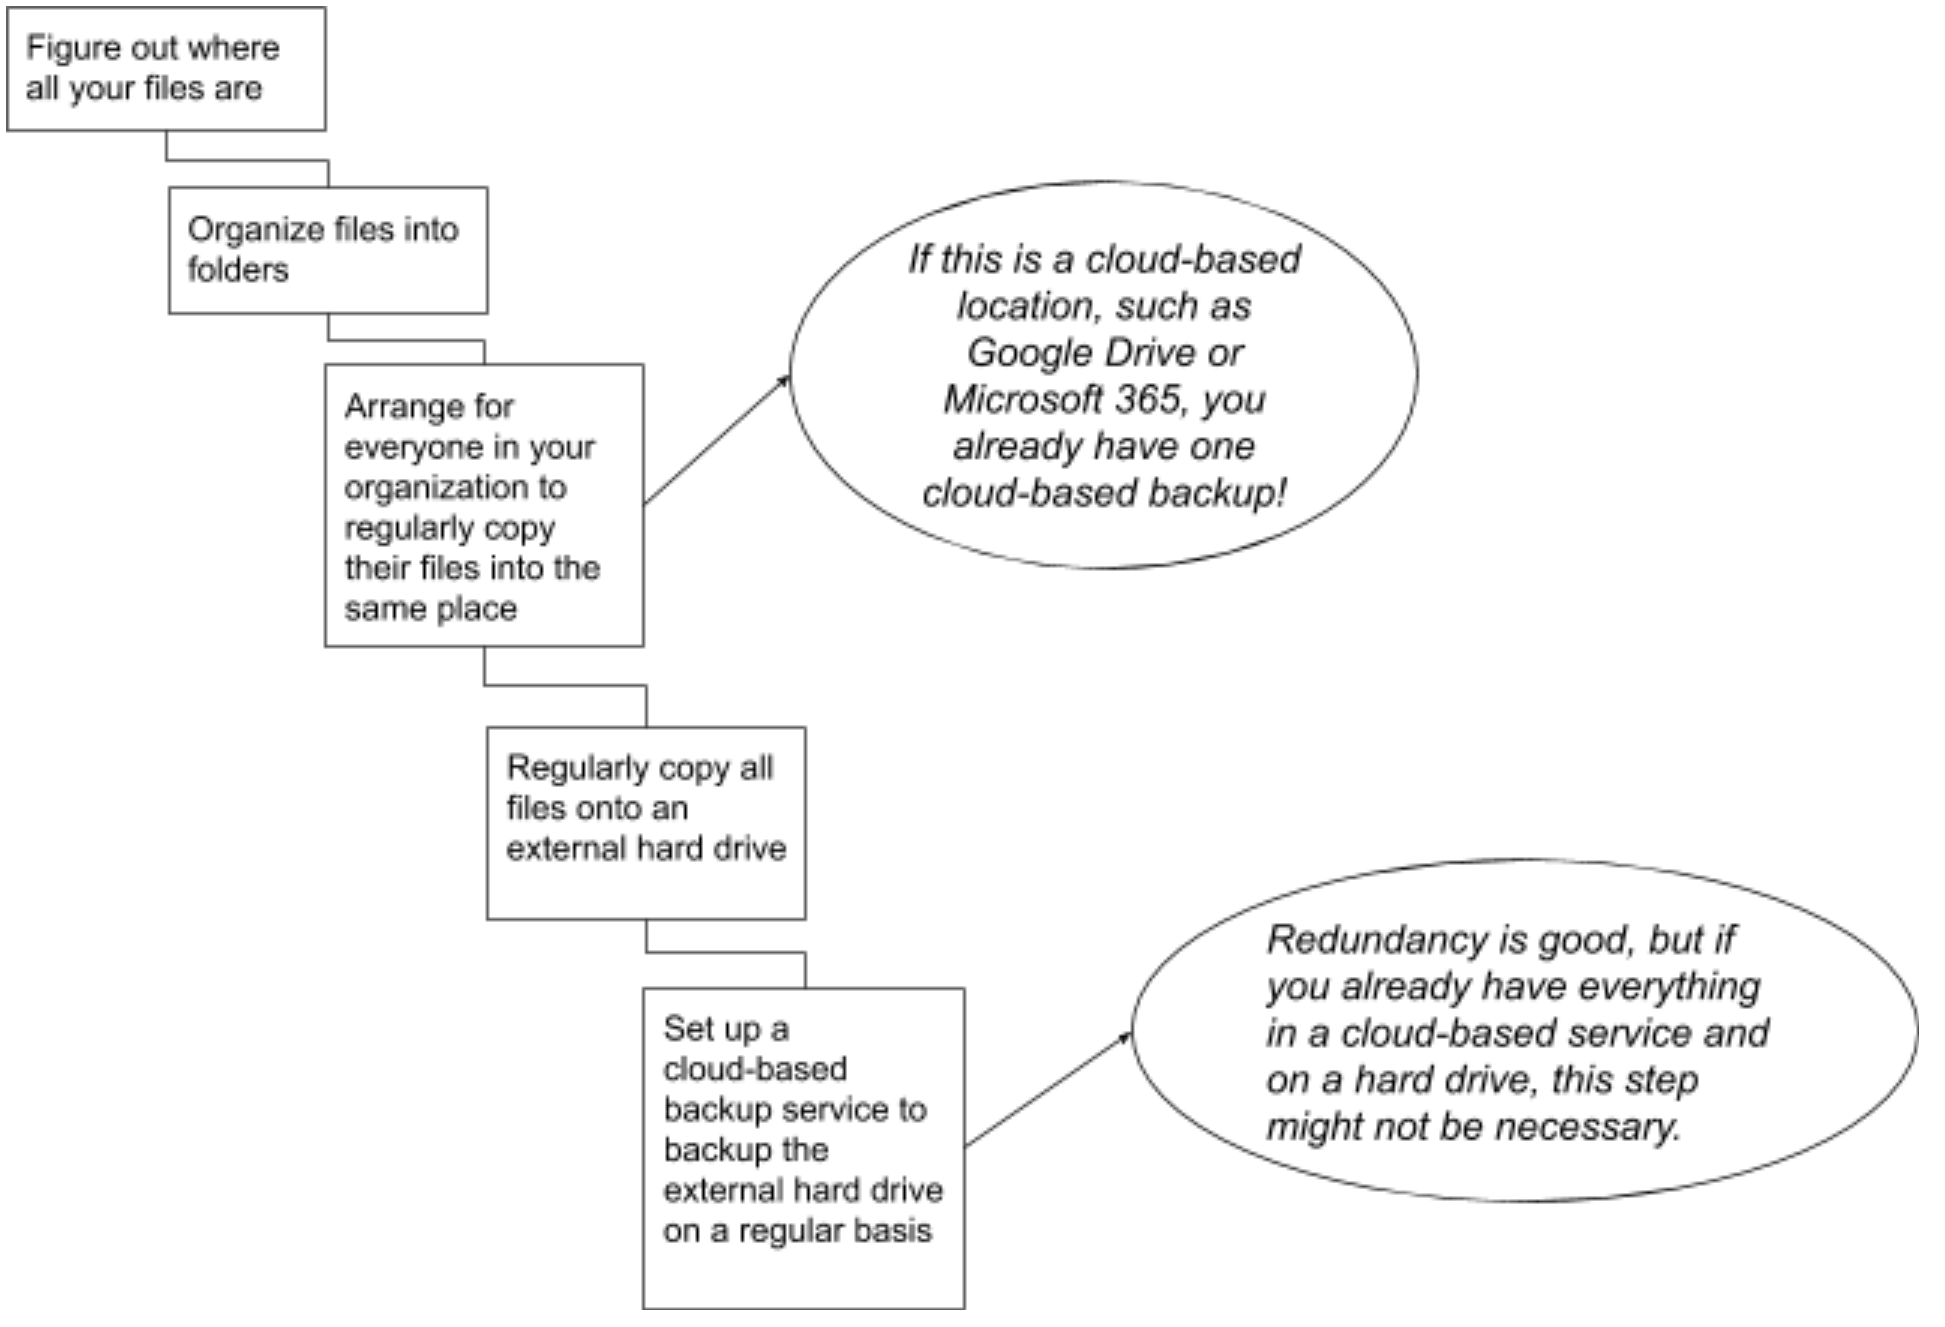
Once you have figured out a quick and efficient way to put all of your files in one place, you can implement additional backup options if you wish. An external hard drive is ideal for this purpose. You can then use a cloud-based backup service, such as Backblaze, to ensure your files are preserved. Between the external hard drive and the regular backups, you will have up-to-date files in the “box” that you then donate to an archive.
Many organizations also use cloud-based computing services like Google Docs/Sheets/Slides, or Microsoft Word/Excel/PowerPoint. If these files are stored in shared folders online rather than on your computers’ hard drives, a monthly or regular routine could include batch-downloading these files for backup on the external hard drive.
Contact LGBTQ RAN for more detailed assistance.
Mobile Devices
It is very likely that much of your organization’s content is regularly generated or captured on individual mobile devices — photos and videos particularly. If the photos and videos relate to your organization’s LGBTQ work, they have historical value and you can preserve them! You should have these photos and videos consolidated into one place on a regular basis, which can be easily achieved by each person uploading their relevant photos and videos to a cloud-based platform such as Google photos or even Facebook.
Once your photos and videos are in a consolidated place, they should also be copied to the external hard drive like other digital files.
Online Platform Instructions
Facebook
Note: this option is only available for individual pages or organizational/business pages, NOT Facebook Groups. Also check the download when it is finished to be sure you’ve downloaded your organizational or business page, not your personal Facebook profile.
- Navigate to your organization’s Facebook page. In the menu at the top of the page, click on “Settings” on the far right side of the menu.
- In the “General” tab, click “Download Page,” then the hyperlink that appears to “Download Page."
- Depending on how Facebook menu options change, this “Download Page” option may be in a different menu. In general, look for Settings or Privacy Settings.
- The next page will give options for a date range, format, and quality level for download. Choose the date range going back to the previous download, HTML format, high-quality media.
- Ensure all check-boxes on the right side of the screen are checked. This will download a record of all your Facebook page’s activity.
- Click “Create File.”
- When available, your download will be available under “Available Copies.”
- Facebook will notify you once this file is available. Click “Download.”
- Facebook will prompt you to re-enter your password for security purposes.
- The file will then begin to download to wherever you have specified your computer downloads will go (usually a Downloads folder). Once complete, you can move the ZIP file to wherever you are keeping archive files.
What’s Included
- A link to a static (unchanging) HTML page with an index of all your available downloaded information
- Posts that you have created on your page
- Photos and videos that you yourself have posted
- Captions on your photos
- Your events
- Any groups your page belongs to
- Any Stories you have posted
What’s Not Included
- Anyone else’s engagement (likes, comments, or shares) with any of your information
- Comments or shares on your posts - no one else’s comments will appear
- Comments, likes or shares on your photos or videos
- Original captions on your photos or videos
- Original posting date on your photos or videos
- Tagged people in your photos
- People who attended or shared your events
Twitter
- Navigate to your organization’s Twitter page.
- In the menu on the left side, click on “More,” then click “Settings and Privacy."
- In the next page, click on “Your Twitter Data.”
- Under “Download an archive of your data,” click “Download archive.” On the following screen, click “Download Archive.” The file will automatically download to wherever you have directed downloaded files to go.
What’s Included
- A link to a static HTML page with a summary of your Twitter activity and information
- That summary HTML page includes a link to more of your Twitter data
- The HTML page also displays your own tweets, and how many shares/likes/comments your tweets got
- Photos and videos you have tweeted
What’s Not Included
- The usernames of anyone else who engaged with your tweets (likes or retweets)
- Comments on your tweets
- Original posting dates on your photos or videos
- Any tweets or photos that tag anyone else on Twitter
This information is available by clicking on any of the tweets in the summary HTML page to go to Twitter, but not in the downloaded archive of information.
Instagram
- Navigate to your organization’s Instagram page on your computer. (These instructions are similar but not identical for mobile devices.)
- Click on the Settings icon at the top of the page.
- Choose “Settings and Privacy.”
- Click “Data Download.”
- Enter the email and password associated with the account.
- The archive file will be emailed to this email address, and can then be saved to wherever you are keeping your archive files.
What’s Included
- Your posted photos and videos, arranged by month and year in folders
- Comments you have left on other accounts (JSON file)
- Media shared in direct messages with you
- Your connections, contacts, search history, and other details stored in JSON (text) files
What’s Not Included
- Captions on your posts
- Others’ comments on your posts
- Original post date (other than the date folder they’re stored within)
- Direct message history
Websites
There are two parts to any website: the data and the display. The data is all the behind-the-scenes information that make up your website, like the foundation and structure of a house. The display is like the paint on the walls: it makes your website pleasant to look at.
The data can be directly downloaded from your website to your external hard drive; this is a task that would require some technical help, from your web designer or a tech-savvy volunteer. The data download only preserves the structure, not the display, of your website.
Saving a display of your website is something that archivists have been working on for years; there are some services that will do this for you for a fee. Please contact LGBTQ RAN for recommendations; these services and our recommendations change over time as technology advances, so we would be glad to share with you our most recent findings.
As we write this guide in mid-2020, the best free option for preserving your website’s display is the Wayback Machine. Please contact LGBTQ RAN to discuss other options, including a Wordpress plugin that automatically generates Wayback Machine snapshots of your Wordpress site.
About the Wayback Machine
The easiest way to ensure your organization’s web page is archived over time is to use the Wayback Machine. The Wayback Machine, a service of the Internet Archive, is a digital archive of the Internet. The free service visits, or crawls, the publicly-available sites on the internet at regular intervals, capturing websites as they look at the time of the crawl. The Wayback Machine will keep your website files indefinitely--you do not need to maintain copies of your website.
The Wayback Machine does not take snapshots of any pages that require passwords or logins to view. This is why your social media is not saved in the Wayback Machine.
How to make sure your website is saved in the Wayback Machine
The Wayback Machine visits and saves billions of websites; it is “told” which websites to visit and save by many organizations, people, and institutions that have deemed websites to have historical value. In addition to these prompts, YOU can tell the Wayback Machine to save your site.
Once the Wayback Machine has your website address, it will visit and save the site on a regular basis (about monthly). You will not need to prompt the Wayback Machine to save your site again; it will save automatically.
The regular snapshots do not always automatically include all of the links and media associated with your site, but you can tell the Wayback Machine to visit each of the pages on your website.
- Navigate to www.archive.org/web and enter your organization’s main web address into the search box. Click “Browse History.”
- If your webpage is already being crawled, you will be directed to a calendar with the dates of your website’s previous snapshots.
- If your website is not being crawled, you will be given an option to have the Wayback Machine start saving your website now. A prompt will appear on the screen asking if you would like to Save This Page.
- If your webpage is already saved, click on one of the dates on the calendar.
- You will need to hover your mouse over one of the calendar dates in a blue or green circle; a small window will appear with one or more timestamps.
- Click on the timestamp to be taken to the version of your site that was available at that date and time.
- You will be able to tell that you’re looking at the saved version of your site, not the current version, because the header across the top of the page will show what date this version was saved.
- On this archived version of your site, try clicking some links, like “About” or “Contact” or any linked page.
- Some or most of these subpages will already be saved in the Wayback Machine, and as you navigate around the saved version of your website, you’ll view the saved versions of all the associated pages.
- If the page is not saved in the Wayback Machine, you will be prompted to Save Page Now. Enter the URL you were trying to save.
- Continue clicking through the pages of your site, saving each one as prompted.
- This may take some time to complete, but once each of your site’s pages are entered in the Wayback Machine, they will be automatically saved in the future.
- You only need to repeat this when you add new pages to your site.
Can I download all of the snapshots from the Wayback Machine?
As of this writing (mid-2020), the only way to receive a full collection of all of the versions of a website is to request it from the Internet Archive: https://help.archive.org/hc/en-us/articles/360017502272-How-to-request-a-collection-
This is an action that should only be necessary if your organization is preparing to donate your digital or online records to a repository.
Do I have to use the Wayback Machine to save my website?
No, you can save backups of your website directly to your external hard drive. Ask your web designer for help if needed, or contact LGBTQ RAN for guidance.
I have a WordPress site, can I download my website from there?
Yes you can! You don’t even need a web designer to do it.
- Log in to the dashboard of your WordPress site.
- In the menu on the left side, click “Tools,” then “Export.” Save the export to your external hard drive.
Email
Like paper letters, your e-mail messages document important events, transactions and relationships. Saving an email involves keeping it separate from your email program. This is because email programs are not meant to keep information for a long time: they can change or stop providing support at any time.
General notes for saving your emails:
- Email file: a single communication between parties, exchanged electronically. One email message.
- Email account: the service providing your email, like Gmail, Yahoo, AOL, iCloud.
- Web mail: accessing your email from a website within a browser. For instance, if you open Chrome or Firefox and go to a website to log into your email, this is web mail.
- Desktop email client: a software program on your computer, not the internet, that downloads and syncs your email. For instance, Microsoft Outlook or Mac Mail.
- MBOX file: when downloading all the contents of an email folder, the file format will be “MBOX.” This is the preferred format for archiving purposes.
- EML file: when downloading a single email, the file format will be “EML.” This is not a preferred format for archiving purposes, but is still acceptable. It is more efficient to download folders of emails in MBOX format.
Identify all your e-mail sources
- Identify your personal e-mail accounts.
- Within each account, find all folders or other separate groupings of messages; include any "archived" messages.
- Decide which messages have long-term value
Pick the messages you feel are especially important.
- You can pick a few messages or many.
- Save attachments that are part of the selected messages .
- Export the selected messages to your external hard drive.
- Create a directory or folder on your external hard drive to put the saved messages and attachments.
- If saving a few messages, you can use the "save as" command in your email browser or software program to export them as individual files.
- If saving many emails, see instructions below for Batch Email Export.
- Give individual messages and attachments descriptive file names.
Instructions for saving your emails
Batch Email Export
Precise instructions for saving all of your email will depend on how you access your email currently. Generally, accessing your email through a desktop client such as Microsoft Outlook or Mac Mail give you a quick and easy way to export all your email. Accessing your email online instead may mean you will need to route your email through a desktop client in order to export all of it.
Desktop client email
- Open your email program (Microsoft Outlook, Mac Mail, etc).
- Look through the menus for something like “Export Mailbox.”
- Save the export on your external hard drive.
Web email - Google (Gmail)
If you access your email through a gmail account, you can export your email as part of Google’s Takeout service. See instructions for Takeout here.
Web email - other services (AOL, Yahoo, etc)
These email services may need to be added to a desktop email client before they can be exported. The instructions below are general guidance:
- Open your desktop email client.
- Find a menu option for importing a mailbox or mail account.
- You should be prompted to enter the email address and password for the account you want to add.
- Once the email account is added to your desktop email client, you can export the mailbox using the instructions above.
Contact LGBTQ RAN for more specific guidance and information.
Google Takeout
All data associated with and created by Google products can be downloaded whenever you wish using their Takeout service. Google products include Gmail, Google Docs, Google Sheets, YouTube, Chrome, Classroom, Google Drive, Google Photos, and many more.
- Navigate to www.takeout.google.com.
- Under “Select Data to Include,” check or uncheck the check boxes based on what you want to include in our download. Some of the services have an option for advanced download settings. Click and choose these as appropriate.
- When finished choosing which data to download, click “Next Step.”
- Choose if you would like a one-time download or a regularly scheduled, repeating download.
- Click “Create Export.”
YouTube
YouTube videos can be downloaded as part of Google’s Takeout service.
Note: the procedures below will give you a lower-resolution (and therefore lower quality) set of video downloads. If possible, it is best practice to save your original video files and backup to your external hard drive instead of or in addition to the procedures below. The main benefit of downloading your YouTube data from Google Takeout is capturing your own viewing activity, if that seems beneficial to the historical record. If not, there is no need to add YouTube’s download to your monthly procedures.
- Navigate to www.takeout.google.com.
- Select or deselect as many Google products as you want to download. For the purposes of this instruction, select YouTube.
- Clicking on the options available will allow you to choose which media format to download; we recommend HTML for any historical data associated with your videos.
- Choose your options for a one-time or recurring download.
- Google will send you a link for the download when it’s ready.
Occasionally, Google Takeout will not download your videos, only the data associated with your viewing history. This can be for various reasons, including copyrighted information (often music) in your videos. If this happens, videos can be downloaded individually:
- While signed in to your YouTube account, click “Videos” on the left side of the page. All of your uploaded videos will be listed.
- Select the checkbox next to one video at a time, then click “More actions” in the menu at the top. Click “download.”
- If the “download” option is greyed out, you can try again at a later time. Sometimes YouTube will limit how many of your own videos you can download per day.
If your organization creates a lot of video content that is hosted on YouTube, it may be wise to keep your own version of these videos stored on your hard drive rather than having to download lower-quality videos from YouTube.
What’s included
- Your videos (probably)
- Your own viewing activity
- Your own subscriptions
What’s not included
- Comments or engagements from viewers
Flickr
Download Individual Pictures & Videos
- Hover over You; select Camera Roll.
- Click the items you’d like to select for download (maximum 500).
- Once items are selected, click Download at the bottom of your screen; Create Zip File.
- Once your .zip files are created, you will receive notifications to both your FlickrMail and your Flickr contact email containing a link to download your files.
Download Albums
- Hover over You; select Albums.
- Hover over the album you’d like to download, and click the download icon that appears on the thumbnail; Create .zip file (500 photo limit also applies to albums).
- Once your .zip files are created, you will receive notifications to both your FlickrMail and your personal Flickr contact email containing a link to download your files.
Download All Content (Flickr Data)
- Click the profile photo in the top right corner; select Settings.
- Under “Your Flickr Data”, click the blue button that says Request My Flickr Data.
- Once your .zip files are created, you will receive notifications to both your FlickrMail and your personal Flickr contact email containing a link to download your files. Links to your .zip files can also be found back in your account settings under “Your Flickr Data”.
What’s Included
What’s Not Included
Virtual Meetings (Zoom, Google Meet, WebEx, etc.)
Virtual meetings and events have become increasingly popular, and are sometimes recorded either for historical purposes or for present-day convenience. These recordings, if they exist, could be saved on your external hard drive along with any other photos and videos.
Consider carefully whether you will record meetings, and for what purpose. Especially in a congregational context, Zoom meetings may include personal or vulnerable conversation that does not need to be recorded, like prayer groups or worship services. Or, online meetings may be for business or organizational purposes, and would have the same type of historical value as meeting minutes.
LGBTQ-RAN can help you decide if and when you should record or save recordings of virtual gatherings.
Webrecorder
WebRecorder (also called Conifer) is a computer program that will allow you to record whatever is on your computer screen for a specified period of time. This can be helpful in capturing more information from your social media that is not included in your archive downloads. For instance, you could record yourself clicking through Facebook posts, comments, and engagements to get a more complete picture of what was happening on your social media. However, this is a time-intensive strategy for documenting history. Depending on the amount of time you have available, it could be reserved for posts that have particularly relevant engagement in the comments and likes.
WebRecorder can be downloaded here: https://github.com/webrecorder/webrecorder-desktop/releases, or search online for WebRecorder download.
(When opening the downloaded app, you may encounter a notification that Webrecorder cannot be opened because the developer is not verified. If this is the case — most likely on an Apple computer — navigate to the computer’s settings or system preferences. In the security module, see if there is a place you can tell your computer to “open anyway” for the WebRecorder app.)
Basic instructions for WebRecorder use can be found at https://guide.conifer.rhizome.org.
Viewing Web Recordings
Web recordings (WARC files) may be replayed directly in your browser, either by visiting https://replayweb.page or by downloading an app version of this website (available at https://github.com/webrecorder/replayweb.page/releases).
For user documentation, see: https://replayweb.page/docs.